Late last year, we started looking into embedded analytical dashboard solutions. We concluded that embedding pre-built dashboards would ultimately box us into one tool. That’s when we discovered Cube, a semantic layer or middleware between the data source and our data application. This blog post will detail our journey in deploying Cube on AWS.
* The header image is taken from GitHub - Cube
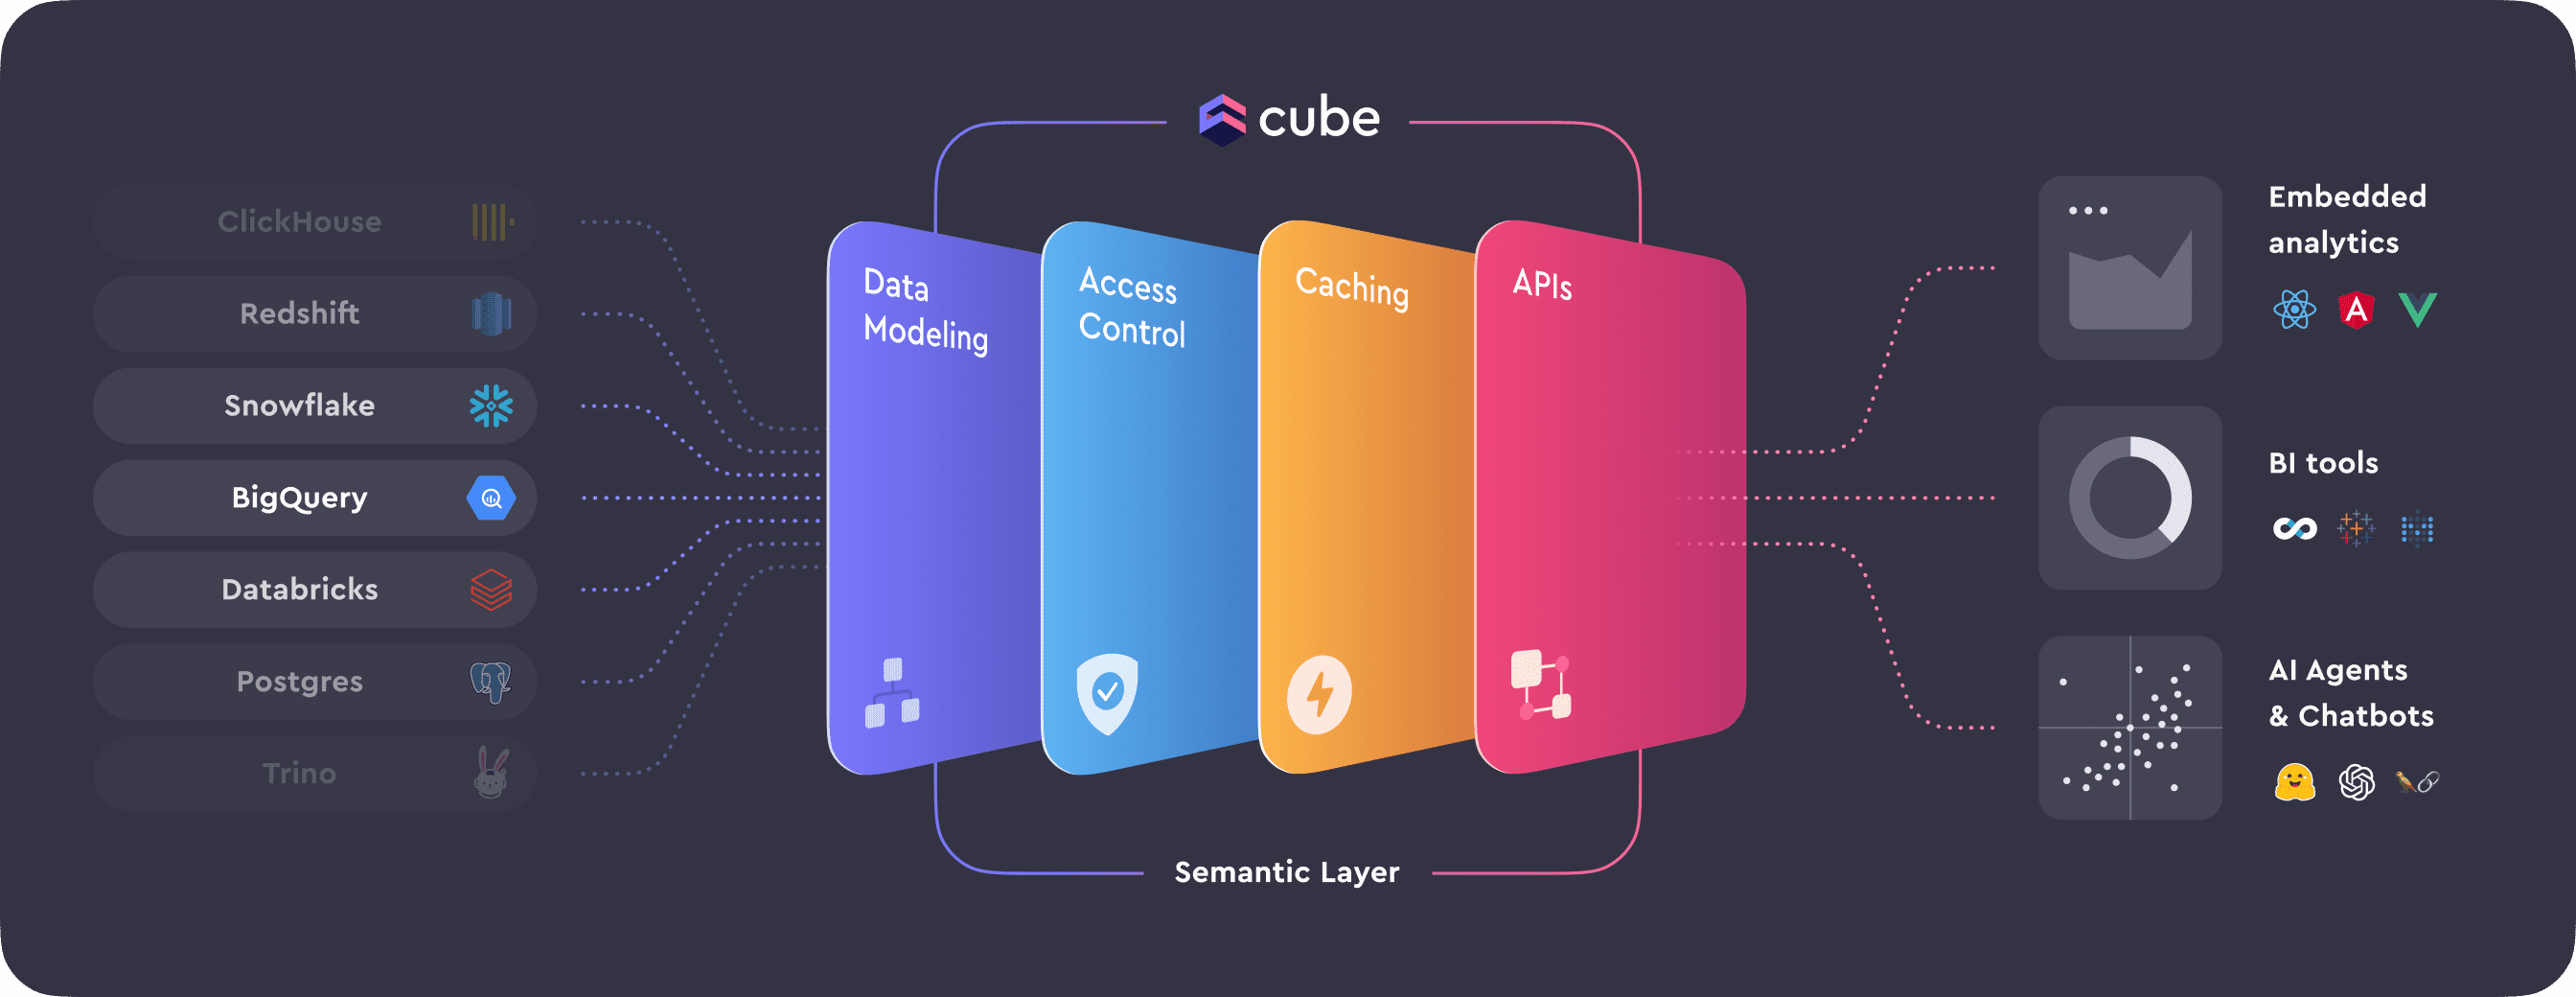
What is Cube?
We chose Cube because it is a headless BI tool that allows more freedom in design and won’t lock us into a vendor. We considered other embedded solutions like AWS Quicksight, Tableau, Looker, and Metabase Embedding. While these tools would let us embed dashboards into our application, we sought flexibility in design and data modeling. We were aware that opting for Cube would require additional Engineering resources but we favored this approach over the cost and maintenance of alternative products.
Cube serves as a semantic layer, making it easy to connect data warehouses, data lakes, or render them accessible for your BI tool, dashboard, or any other use case. They expose their API to custom-build a UI around the data. The next step was deploying this in our infrastructure, and for that, we use AWS. We use Terraform by HashiCorp to deploy all of our infrastructure in a codified manner. This allows for PR reviews and having everything in code rather than building it out in the AWS console.
Prerequisites
At Knack, we use Terraform to deploy and manage our infrastructure on AWS. We use the following AWS services, which I’ll delve deeper into later in this article:
I will not go into detail about these tools but rather how they helped us achieve the goal of deploying a production-ready Cube setup. You should have an understanding of what each tool does and is used for. You will also need a data warehouse or database to connect Cube to. In our case, we are using Redshift.
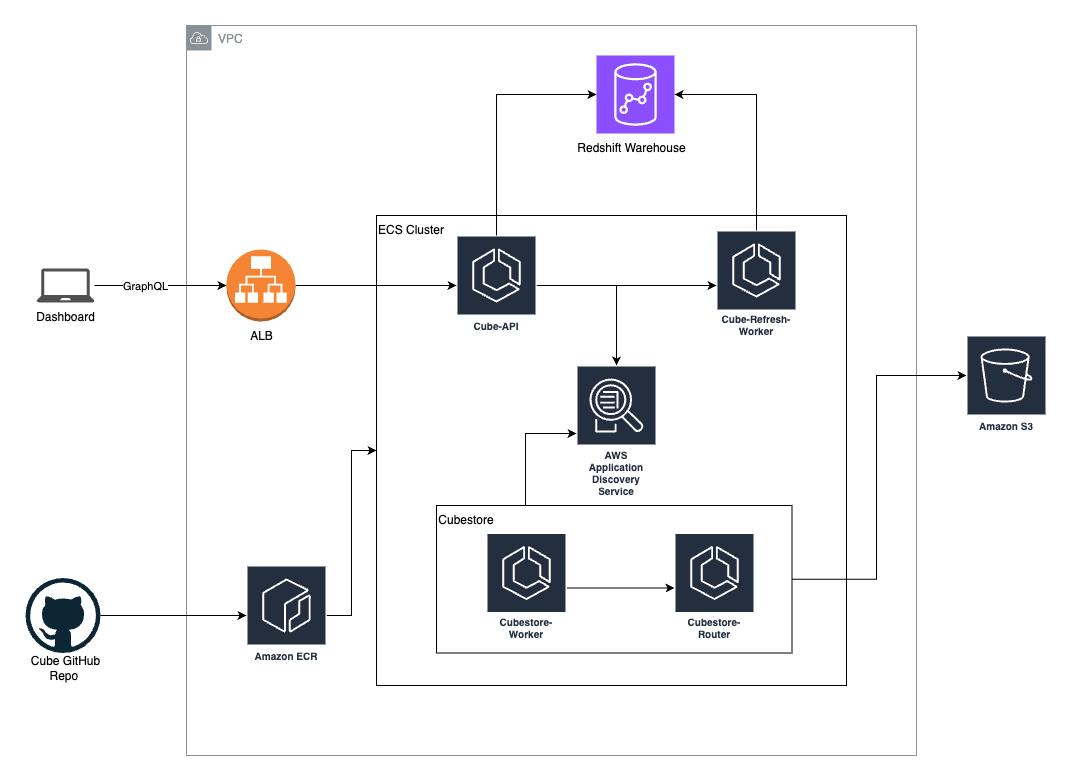
Here is a high-level overview of the architecture utilized for deploying Cube on AWS:
Setting up Your Project in Terraform
module "cube-bi" {
  source = "./services/cube-bi"

  providers = {
    aws.networking = aws.networking
  }

  environment         = local.environment
  region              = var.region
  vpc_id              = data.aws_vpc.vpc.id
  cube_security_group = data.aws_security_group.ecs_security_group.id

  container_env = merge({
    cubejs_db_host = data.aws_lb.nlb.dns_name
  }, var.cube-bi_config[local.environment].container_env)

  ecs_cluster_arn = data.aws_ecs_cluster.ecs_cluster.id

  openid_connect_provider_arn = aws_iam_openid_connect_provider.github.arn

  initial_ecr_image_cube      = "******.dkr.ecr.us-east-1.amazonaws.com/knack/cube:latest-cube"
  initial_ecr_image_cubestore = "******.dkr.ecr.us-east-1.amazonaws.com/knack/cubestore:latest-cube"

  domain_cube = var.cube-bi_config[local.environment].domain

  alb_arn      = data.aws_lb.aws_alb.arn
  alb_priority = 30

  desired_count_cube_api            = var.cube-bi_config[local.environment].desired_count_cube_api
  desired_count_cube_refresh_worker = var.cube-bi_config[local.environment].desired_count_cube_refresh_worker
  service_count_cubestore_router    = var.cube-bi_config[local.environment].service_count_cubestore_router
  service_count_cubestore_worker    = var.cube-bi_config[local.environment].service_count_cubestore_worker

  alarm_sns_topic_arn = module.opsgenie_data_cloudwatch.sns_arn
}
The above module sets up our service with the variables needed. We are passing in the information needed to deploy this via Task Definitions on ECS. We are passing in environment, region, vpc_id, security_group, ecs_cluster_arn, and some container_environments, which pass in the Redshift username and database name. We already pushed the Docker Images for Cube and the Cubestore to our ECR repo. These include our data modeling and config files. We pushed these via our GitHub repository, where we keep all the modeling and files needed to run Cube.
Task Definitions
The first step is to set up the task definitions for the Cube services. We need to deploy the cube-api, cube-refresh-worker, cubestore-router, and the cubestore-worker. To set up these task definitions, we will use a pre-built module. This module does a basic set-up of the task definition with the variables seen. We give it the image, cpu, memory, portMappings, execution_role_arn, environment variables, secrets, and a CloudWatch configuration.
module "this_task_template_cube_api" {
  source = "../../../modules/aws-ecs-task-definition"

  family = "${local.combined_name}-api-template"

  image             = var.initial_ecr_image_cube
  cpu               = 1024
  memory            = 512
  memoryReservation = 256
  name              = "cube-api"
  essential         = true

  task_role_arn      = module.this_task_execution_role.this_iam_role_arn
  execution_role_arn = module.this_task_execution_role.this_iam_role_arn

  portMappings = [
    {
      containerPort = 4000,
      protocol      = "tcp"
    }
  ]

  environment = local.cube_environment_variables

  secrets = concat(local.secrets, [
    {
      "name"      = "CUBEJS_JWT_KEY"
      "valueFrom" = aws_ssm_parameter.cubejs_jwt_key.arn
    }
  ])

  logConfiguration = {
    logDriver = "awslogs",
    options = {
      "awslogs-group"         = aws_cloudwatch_log_group.this.name
      "awslogs-region"        = var.region
      "awslogs-stream-prefix" = "cube-api"
    }
  }
}
The CUBEJS_CUBESTORE_HOST was the first challenge we faced, as we needed a way to pass in the host address of the Cubestore host. We decided to use Service Discovery. Below are the environment variables that we are passing into the container.
cube_environment_variables = [
    {
      "name"  = "CUBEJS_DB_TYPE"
      "value" = "clickhouse"
    },
    {
      "name"  = "CUBEJS_DB_PORT"
      "value" = "8123"
    },
    {
      "name"  = "CUBEJS_DB_HOST"
      "value" = var.container_env.cubejs_db_host
    },
    {
      "name"  = "CUBEJS_DB_NAME"
      "value" = "external_analytics"
    },
    {
      "name"  = "CUBEJS_DB_USER"
      "value" = var.container_env.cubejs_db_user
    },
    {
      "name"  = "CUBEJS_CUBESTORE_HOST"
      "value" = "cubestore-router.cube-bi.local"
    },
    {
      "name"  = "CUBEJS_CACHE_AND_QUEUE_DRIVER"
      "value" = "cubestore"
    }
  ]
Service Discovery
Service Discovery is a managed service that enables automatic, dynamic, and highly available discovery of services within your Amazon Virtual Private Cloud (Amazon VPC) network. This helped us pass in the host as environment variables for the services to talk to each other.
To set it up, we will use the aws_service_discovery_private_dns_namespace and aws_service_discovery_service resources by Terraform. We created a private DNS namespace called cube.local for each service to use. Next, we need to set up the service itself, in this case, for the cubestore-router and cubestore-worker. For the cubestore-worker, we set it up so we can deploy multiple workers, hence the ${count.index + 1} and count configuration. It is straightforward to set up, as we pass in the DNS namespace from the namespace module and give it a DNS record. This will create a DNS record for the ECS service to be discovered in our VPC. This will be needed when we set up the ECS service, but before that, we’ll need to set up the application load balancer.
resource "aws_service_discovery_private_dns_namespace" "discovery_namespace" {
  name        = "cube.local"
  description = "Discovery service namespace for cube services to use"
  vpc         = var.vpc_id
}

resource "aws_service_discovery_service" "this_cubestore_router" {
  name = "cubestore-router"

  dns_config {
    namespace_id = aws_service_discovery_private_dns_namespace.discovery_namespace.id

    dns_records {
      ttl  = 10
      type = "A"
    }

    routing_policy = "MULTIVALUE"
  }

  health_check_custom_config {
    failure_threshold = 1
  }
}

resource "aws_service_discovery_service" "this_cubestore_worker" {
  count = var.service_count_cubestore_worker
  name  = "cubestore-worker-${count.index + 1}"

  dns_config {
    namespace_id = aws_service_discovery_private_dns_namespace.discovery_namespace.id

    dns_records {
      ttl  = 10
      type = "A"
    }

    routing_policy = "MULTIVALUE"
  }

  health_check_custom_config {
    failure_threshold = 1
  }
}
Elastic Load Balancer or Application Load Balancer
To service API requests from our dashboard, we need an application load balancer to pass these requests to the Cube API service. We will use the aws_alb_target_group and aws_lb_listener_rule resources from Terraform. We give it a port, protocol, the VPC ID, and a health_check path. Cube has two health check paths, which resolve in /readyz and /livez. /readyz returns the state of the deployment, and /livez provides the liveness state of the deployment by testing the data source. We chose the /readyz path. Next, we’ll set up a listener rule for the load balancer.
resource "aws_alb_target_group" "this_cube_api" {
  name                 = "${local.hyphen_combined_name}-api"
  port                 = 4000
  protocol             = "HTTP"
  vpc_id               = var.vpc_id
  deregistration_delay = 60

  health_check {
    path              = "/readyz"
    protocol          = "HTTP"
    matcher           = 200
    healthy_threshold = 2
  }

  lifecycle {
    create_before_destroy = true
  }

  tags = {
    Environment = var.environment
  }
}

resource "aws_lb_listener_rule" "this_cube_api" {
  listener_arn = data.aws_lb_listener.this.arn
  priority     = var.alb_priority

  action {
    type             = "forward"
    target_group_arn = aws_alb_target_group.this_cube_api.arn
  }

  condition {
    host_header {
      values = [var.domain_cube]
    }
  }
}
EC2 Instances
For our tasks to be deployed, we’ll need to set up some EC2 instances in our VPC. We are setting it up via a custom module that sets up the auto-scaling group, the number of instances, security groups associated with the instances, IAM roles, and cloudwatch alarms. We use this module in all of our infrastructure so we don’t have to copy and paste the same configuration.
module "ecs_primary" {
  source = "../modules/aws-ecs-cluster"
  name   = "data-primary"

  environment = local.environment
  region      = var.region
  vpc_id      = module.vpc.vpc_id

  instance_type       = var.ecs_primary_config[local.environment].instance_type
  instance_subnet_ids = module.vpc.private_subnets

  min_size         = var.ecs_primary_config[local.environment].min_size
  max_size         = var.ecs_primary_config[local.environment].max_size
  desired_capacity = var.ecs_primary_config[local.environment].desired_capacity

  alarm_sns_topic_arn = module.opsgenie_data_cloudwatch.sns_arn

  ingress_with_source_security_group_id = [
    {
      rule                     = "all-all"
      source_security_group_id = module.alb_primary.this_security_group_id
    }
  ]
}
ECS Service
To piece everything together, we’ll need to deploy each service from the task definition. However, before we can deploy there are a few considerations to take into account. First, we need to determine the network mode for each service, crucial in connecting these services. AWS offers 3 network modes: host, bridge, and awsvpc. The host mode is the most basic network mode; Bridge mode is the default network mode for Docker, allowing the use of a virtual bridge between the networking of the container. In our case, we will use the awsvpc network mode. One thing to note is the limitations of ENI (Elastic Network Interfaces) in your EC2 instances. For example, they only allow 3 ENIs in a t3.medium instance.
We will use the aws_ecs_service resource from Terraform. I chose to show the cubestore-worker as an example to demonstrate how dynamic and scalable this deployment is. This can be used for other services as well. As we can see, we have a count variable to tell Terraform how many workers it should create. Our current setup is using 1 worker because we don’t need more at the moment. We can see we have to give the task definition to the service. We created a local variable to be able to correctly pass in the task definition we need. We created a list to access the correct task definition like this: cubestore_worker_ids =[module.this_task_template_cubestore_worker-1.arn, module.this_task_template_cubestore_worker-2.arn]. This allows Terraform to get the correct task definition from the index.
When employing the awsvpc network mode, it is essential to provide a network_configuration that includes specifying a security group and private subnets. This configuration is crucial for associating an Elastic Network Interface (ENI) with a specific subnet. This association is achieved by utilizing a data block named aws_subnets. Additionally, we need to link the previously created service discovery with the task, and this is facilitated by utilizing the service_registries configuration value. In this context, we simply pass the Amazon Resource Name (ARN) of the relevant module for seamless integration.
resource "aws_ecs_service" "this_cube_api" {
  name            = "${local.combined_name}-cube_api"
  cluster         = var.ecs_cluster_arn
  task_definition = module.this_task_template_cube_api.arn

  desired_count                      = var.desired_count_cube_api
  deployment_minimum_healthy_percent = var.desired_count_cube_api > 1 ? 50 : 0
  deployment_maximum_percent         = 100

  load_balancer {
    target_group_arn = aws_alb_target_group.this_cube_api.arn
    container_name   = "cube-api"
    container_port   = 4000
  }

  deployment_circuit_breaker {
    enable   = true
    rollback = true
  }

  lifecycle {
    ignore_changes = [
      task_definition,
      capacity_provider_strategy,
    ]
  }
}

resource "aws_ecs_service" "this_cube_refresh_worker" {
  name            = "${local.combined_name}-refresh-worker"
  cluster         = var.ecs_cluster_arn
  task_definition = module.this_task_template_cube_refresh_worker.arn

  desired_count                      = var.desired_count_cube_refresh_worker
  deployment_minimum_healthy_percent = var.desired_count_cube_refresh_worker > 1 ? 50 : 0
  deployment_maximum_percent         = 100

  deployment_circuit_breaker {
    enable   = true
    rollback = true
  }

  network_configuration {
    security_groups  = [module.security_group.this_security_group_id]
    subnets          = data.aws_subnets.private.ids
    assign_public_ip = false
  }

  lifecycle {
    ignore_changes = [
      task_definition,
      capacity_provider_strategy,
    ]
  }
}
Conclusion
To round out this article, we learned a few things about deploying Cube via ECS. First, we had to use service discovery for seamless communication between the cube services. Second, we needed to use awsvpc network mode in oder for the service to get it’s own ENI. This also played a crucial part for seamless communication. Third, we had to make sure the security groups of each service had the correct permissions set up. Before starting on this journey, we had limited knowledge about AWS and Terraform, and it proved to be a great challenge to get a much better understanding of AWS, networking, ECS, EC2, Terraform, etc.