Why does our Laravel app need a Salesforce integration?
Knack Tutoring is a unique peer-tutoring platform used by colleges and universities across the US. Students can find tutors who attend their specific school and excelled in the exact courses they are enrolled in. Dozens of higher ed institutions rely on Knack to handle their tutoring needs, and with that comes the need to share student tutoring data with college administrators in ways that are most convenient for them.
At Knack we partner with schools all over the US with student populations ranging from the hundreds to tens of thousands. Schools such as University of Florida and Auburn University have already found that students using Knack are 10% more likely to pass courses. When schools deploy Knack, it is important that they retain sight on how often students are using Knack tutoring services.
Many of our partners use Salesforce. Salesforce has an Education Data Architecture (EDA) extension that schools implement to allow them to securely and privately upload and share course catalogs, student enrollment data, and more. Many schools also utilize the Student Success Hub for Higher Education (formerly Advisor Link) for advising. We decided to build an integration to allow us to sync tutoring session data nightly with our partners’ Salesforce instances.

Our Laravel backend integrates with our Salesforce package to transfer tutoring session data from the Knack database to our partners’ Salesforce instances. We use several Salesforce API endpoints to GET and POST data to our partners’ instance. This way their administrators are able to access Knack tutoring data directly from the Salesforce instance instead of needing to log into Knack specifically to view tutoring data. Among other things, this integration empowers administrators to encourage specific students to seek out tutoring and allows them to see which courses at their institution require the most student tutoring.
Building our Salesforce Package
The different types of Salesforce packages can be read about here, but for brevity I am just going to share that we decided to use Clicks Not Code to create a managed package containing a Connected app as one of its components. A Connected app is the type of Salesforce component that allows an external application (Knack) to securely integrate with a Salesforce instance via APIs. It is important to note that our entire solution is called a package, and one of many components in our package is the Connected app which is used for authentication when using an API. This led to confusion for us early on because the AppExchange is used to download packages, which can optionally contain a component called a Connected app.
Selecting the Right Components
Our Salesforce package is made up of Custom Objects, their related Fields, a Tab, Page Layouts, and the previously described Connected app, which are some of the many types of components that can be present in a Salesforce package. It is also a hard requirement that anyone installing the Knack Salesforce package already has the previously described Education Data Architecture extension installed on their Salesforce instance.
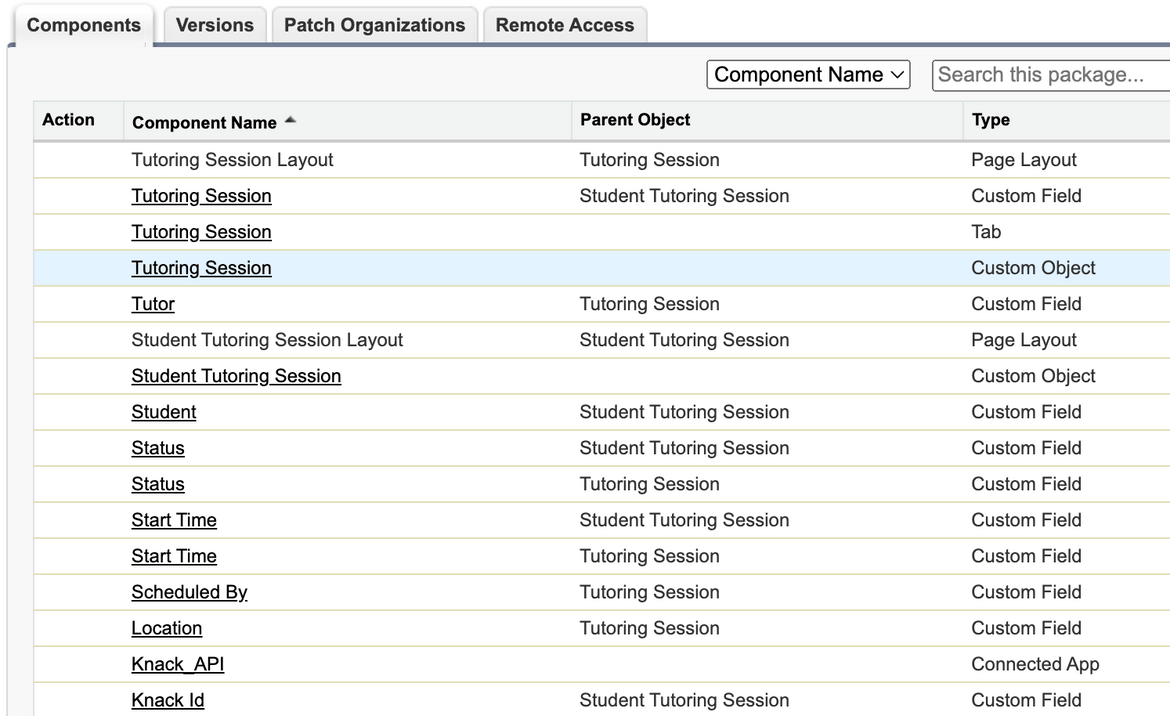
A view of some of the custom components that are in our Salesforce package
Custom Objects are created and updated using the Object Manager, which can be found by clicking the gear in the top right corner of your Salesforce instance, clicking “Setup”, and searching “Object Manager” in the Quick Find search bar on the far left of your screen. Once you are in Object Manager click the “Create” button and then Custom Object.
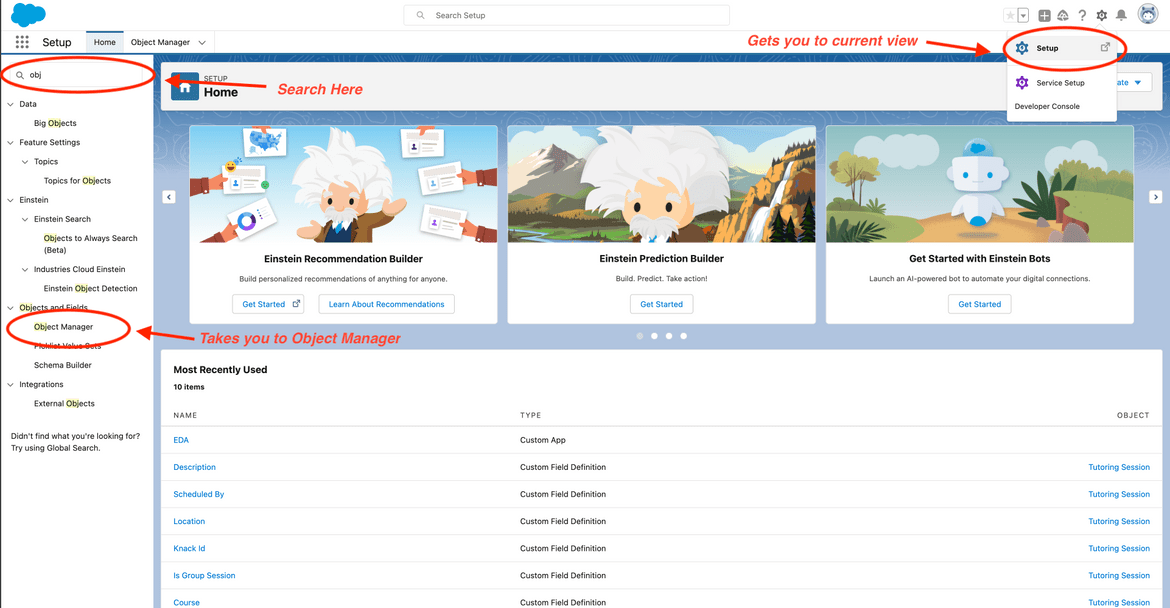
Locating the Object Manager
Our custom objects mirror our Laravel models, so we created a custom object called “Tutoring Session” that mirrors what is called a Session model in our codebase and another called “Student Tutoring Session” which mirrors our internal UserSession model. The former stores all of the data related to the tutoring session, and the latter stores data related to each individual student involved in a tutoring session. These objects have a many-to-one relationship because multiple students can participate in one group tutoring session.
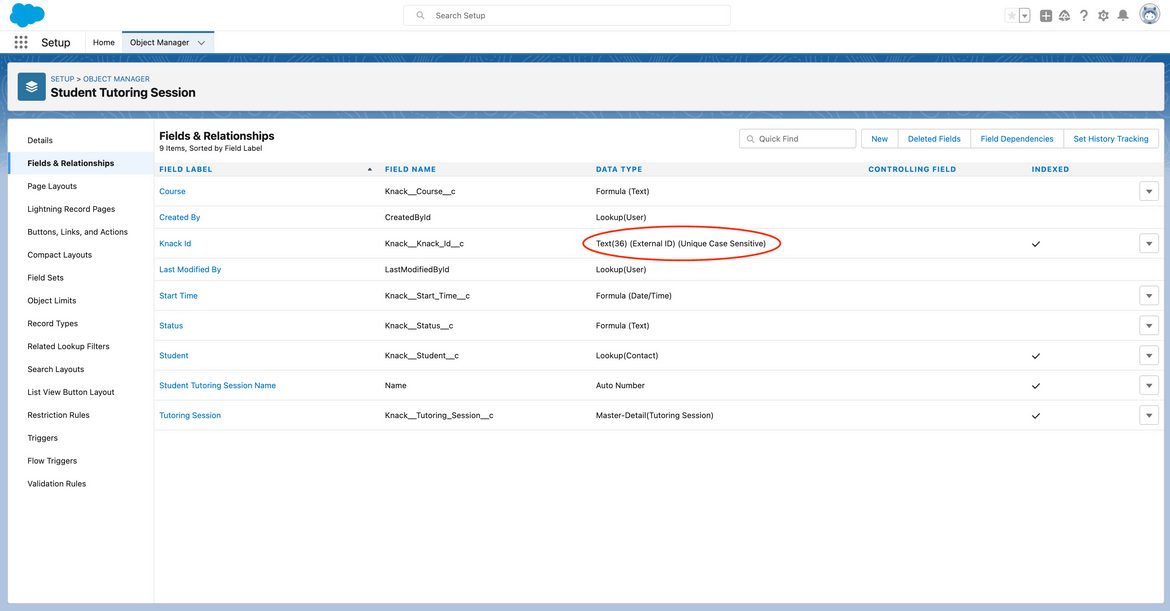
Student Tutoring Session custom object requires unique external ID field so that we can perform API lookups (more on that later)
Custom Tabs allow Salesforce users to view data related to custom objects. To add a new custom tab go to “Setup” and in the Quick Find box search for “Tabs”. Once you are in Tabs click “new” and select your custom object and the styling that you want to appear on your custom tab. On step 2 of 3 we chose to apply one tab visibility to all profiles but your individual needs may vary. The final step requires you to choose the packages you want the custom tab to appear on, and for us the EDA package was the only selection.
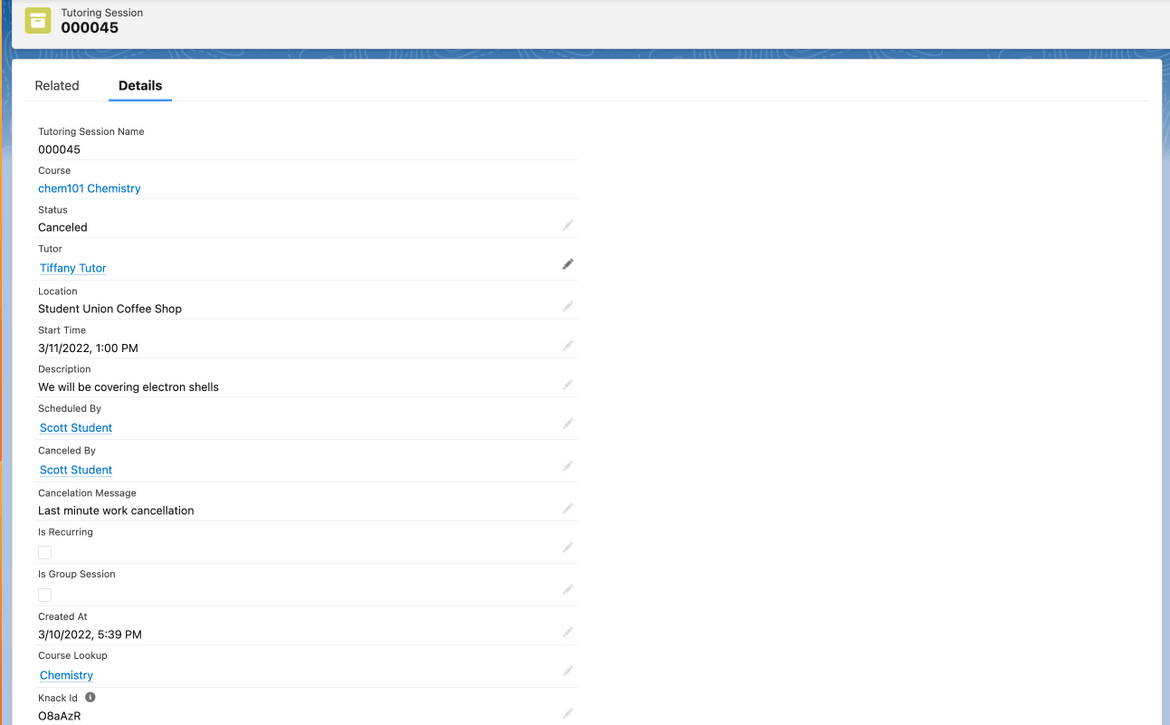
Here's a look at our custom tab that presents the data from our Tutoring Session custom object
Data Security
Like most companies, we hold private data, which means that we have to be careful to only present data to the intended partner. We also have to make sure all data is encrypted and secure while in transit. We created a Connected app because (like mentioned previously) that is the component that is required in our package so that we can securely use the Salesforce API when uploading data to our partner’s Salesforce instances.
To create a Connected app go to “Setup” and search “App Manager”. Once in App Manager click “New Connected App” in the top right. Your connected app API Name will need to be universally unique to all of Salesforce, so if you are building a prototype application you might not want to use the API Name you want to have for your final application, because it will never become available again even if you delete your prototype.
After you create your Connected app go back to App Manager, find your app, find the arrow to the far right, and click “edit”. This is where you will enable OAuth, use a digital signature, and upload a certificate. The OAuth scope needs to include refresh_token and api. This part of the process is what handles authorization so that our Laravel app can securely communicate with any Salesforce instance that has our package installed.
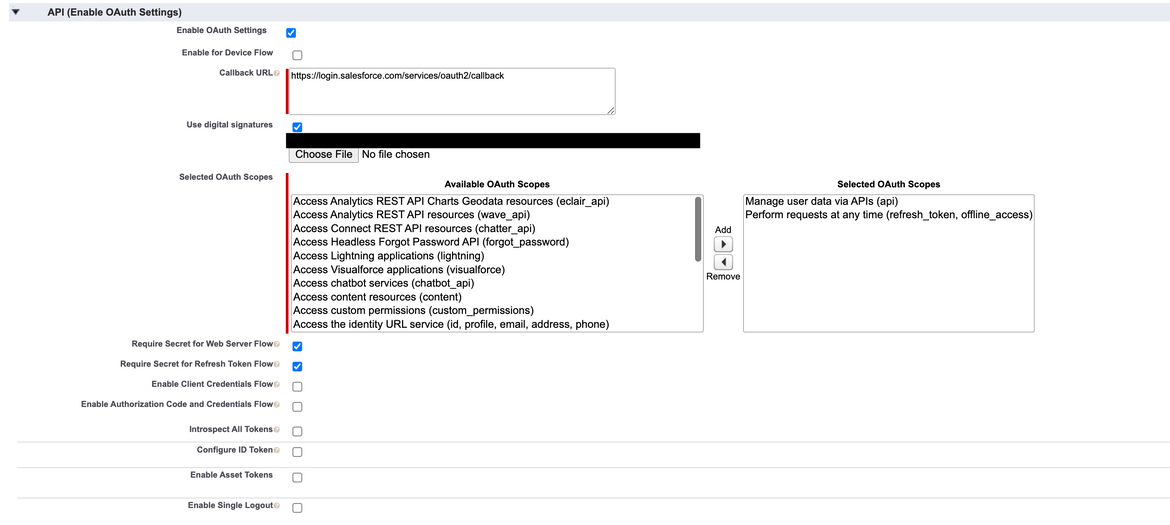
This is what our OAuth settings and scope look like after we are finished editing our Connected App component
Packaging our Solution
Now that we have custom objects to store our data, custom tabs to present our data to end users, and a Connected app to give our Laravel instance API access to Salesforce we are ready to package up our solution. Go to Setup and search “Package Manager”. Click “new”, name your new package, and click “save”. While viewing your package’s detail page you can click “Add” to add your custom objects, custom tabs, and Connected app. Choose your component type (Custom Object, tab, etc) and add it to your package. Repeat this process until you have your Custom Objects, Tabs, Connected app, and anything else you might require for your custom Salesforce app.
Once we have all of our desired components it is time to upload our package. While viewing your package click “upload” and give your package a version name and number. If you are in a test state or you are still going to be making changes to your package then it is imperative that you not mark your package as “Managed - Released”. You must mark your package as “Managed - Released” before you can release it on the AppExchange, but once you do that you lose a lot of abilities when it comes to editing your package, so it is ideal to put that off as long as possible.

Our package type is "Managed(Extension)" but yours will say "Unmanaged" until released to the AppExchange (Click to enlarge)
Once that your package is finished you will want to create a sandbox organization to test it in. Just keep in mind you will only be able to make changes to your custom objects up until the point you make a Managed - Released version of your app. This is to prevent untenable schema changes from breaking your users’ Salesforce instances.
Building the integration on our end using Laravel
At Knack we use the Laravel framework to power our GraphQL API and Laravel Nova to give our Operations team an administrative interface. This section assumes you understand the basics of Laravel and REST APIs. We also use Laravel Actions, so everytime I reference an action I will be referring to a class that uses that library’s AsAction trait. Side note that we will not be using the Salesforce PHP SDK or any other Salesforce PHP toolkit since this integration is not too involved.
To start, we create a new model in our Laravel codebase called DataDeliveryDestination which holds information about our data syncing process. On this object we store the related organization, most recent sync time, a verbose mode boolean that we activate for logging, an editable cron string, and an is_enabled boolean that can be used to switch the integration on and off. Most importantly, the DataDeliveryDestination object stores an encrypted json array (stored in MySQL as TEXT) that contains sensitive information about the related organization’s Salesforce instance.
/**
 * @property int $id
 * @property string|array $configuration - encrypted configuration array for each organization
 * @property bool $is_enabled - allows us to easily disable integration
 * @property bool $verbose_mode - allows us to turn logging on and off
 * @property int $organization_id - related Organization
 * @property Carbon $last_sync - last time data sync was executed
 * @property string $connector_type - Salesforce, CSV, other assorted Student Information Systems
 * @property string $cron_string - a job checks this once an hour to decide whether to execute
 * @property Carbon $deleted_at
 * @property Carbon $created_at
 * @property Carbon $updated_at
 *
 * @mixin Eloquent
 *
 * @property-read Organization $organization
 */
class DataDeliveryDestination extends Model
{
    /**
     * Associated organization.
     */
    public function organization(): BelongsTo
    {
        return $this->belongsTo(Organization::class, 'organization_id');
    }

    /**
     * Lets Operators know which specific config key is missing.
     */
    public function listMissingConfigKeys(): array
    {
        if ($this->configuration === null) {
            return ['no config is set'];
        }

        $missingKeys = [];

        foreach (DataDeliveryDestinationType::REQUIRED_KEYS[$this->connector_type] as $requirement) {
            if (!array_key_exists($requirement, $this->configuration)) {
                $missingKeys[] = $requirement;
            }
        }

        return $missingKeys;
    }

    /**
     * Used to turn more verbose logging on/off.
     */
    public function logIfVerboseMode(string $message): void
    {
        if ($this->verbose_mode) {
            Log::debug($message);
        }
    }
}
A truncated version of our DataDeliveryDestination class
Since we need to perform lookups on Course and Contact objects in our partner’s Salesforce instances we need each partner to provide us with the name of their External ID fields on those objects. These typically follow the pattern Banner_ID__c and External_Course_ID__c. These field names will be required when building URLs for our API calls. It is likely that naming conventions will be different for each partner, so these two field names are stored in the partner config. We also store some environmental variables and the integration user’s email address, which is required for the integration to run. All of this information is stored in the previously mentioned encrypted JSON array.
We run our “InitiateDataDeliveryCron” command every hour, and it checks the individual cron string for each of our Data Delivery Destinations. If the cron expression is due then we dispatch our asynchronous PushSessionsDataToSalesforce action, which will handle our data being delivered to Salesforce. We have separate actions for RetrieveSalesforceBearerToken, MakeIndividualSessionApiCallToSalesforce which pushes data to one of our custom objects in Salesforce, and MakeIndividualUserSessionApiCallToSalesforce which pushes data to our other custom object. We log any failed requests to the Salesforce API on a DataDeliveryLog object so that our Operations team can get to the bottom of any discrepancies.
API Endpoints we use
| Task | Endpoint |
|---|---|
| Retrieve bearer token | /services/oauth2/token |
| Retrieve Salesforce ID for Course | /services/data/v53.0/sobjects/hed__Course__c/{course_column_name}/{course_id} |
| Retrieve Salesforce ID for User | /services/data/v53.0/sobjects/Contact/{contact_column_name}/{contact_id} |
| Upsert Tutoring Session Record | /services/data/v53.0/sobjects/Knack__Tutoring_Session__c/Knack__Knack_Id__c/{knack_id} |
| Upsert Student Tutoring Session Record | /services/data/v53.0/sobjects/Knack__Student_Tutoring_Session__c/Knack__Knack_Id__c/{knack_id} |
Let’s break down what Retrieve Salesforce ID for Course involves:
/services/data/v53.0/sobjects/hed__Course__c/{course_column_name}/{course_id}
The API version we are using is v53.0. “sobjects” refers to the fact that we are querying an object, and hed__Course__c is the universally unique name for all Course objects within EDA. Our Laravel backend automatically concatenates the column name that our partners use (stored in their previously described encrypted config) for their Course objects, and the last variable is the course ID for the specific course we are querying. We use the response from this API request (and several others) to build a future POST request
Let’s also have a look at Upsert Tutoring Session Record from the API table above:
/services/data/v53.0/sobjects/Knack__Tutoring_Session__c/Knack__Knack_Id__c/{knack_id}
Knack__Tutoring_Session__c is the universally unique name for our previously created custom object “Tutoring Session”. Knack__Knack_Id__c is the universally unique name for our unique identifier on the object, which is a ULID. This field’s data type is Text(36) (External ID) (Unique Case Sensitive), which means it can be used to uniquely identify a record in Salesforce. This is helpful because we want to update existing records instead of creating duplicate records every time our integration is run.
Full API Flow in Action
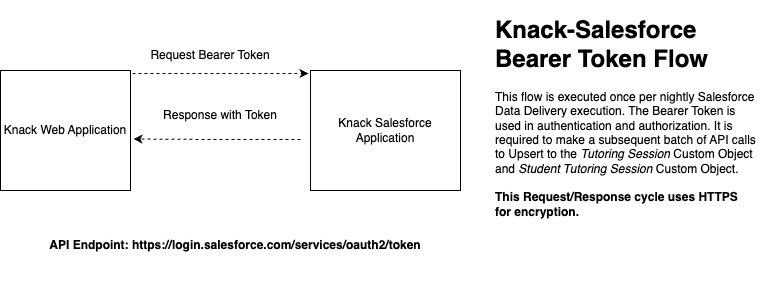
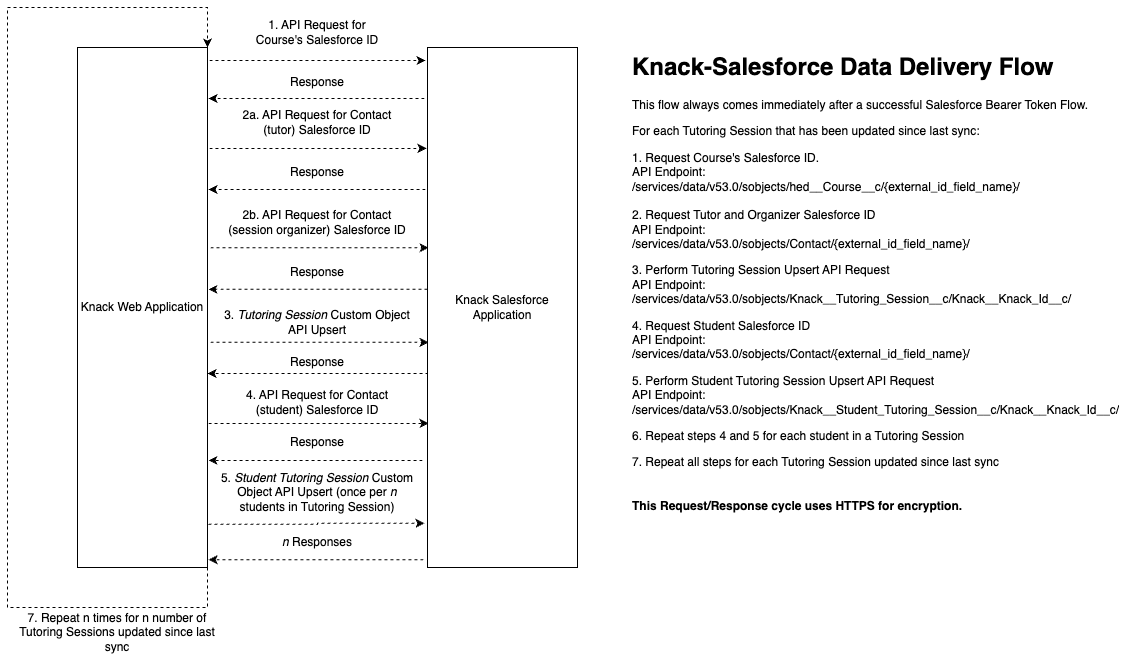
Steps 1, 2, and 4 of the Knack-Salesforce Data Delivery flow are simply requesting the Salesforce ID of objects so that we can use those IDs to build POST requests for steps 3 and 5.
Testing Connectivity
Once the app is installed we can run a connectivity test. We just need the integration user’s email, the external ID fields for the Contact and Course objects in the target Salesforce instance, and a client ID and private key that never change. Then we go to Knack’s internal admin (Laravel Nova), click Test Connectivity, and voilà!
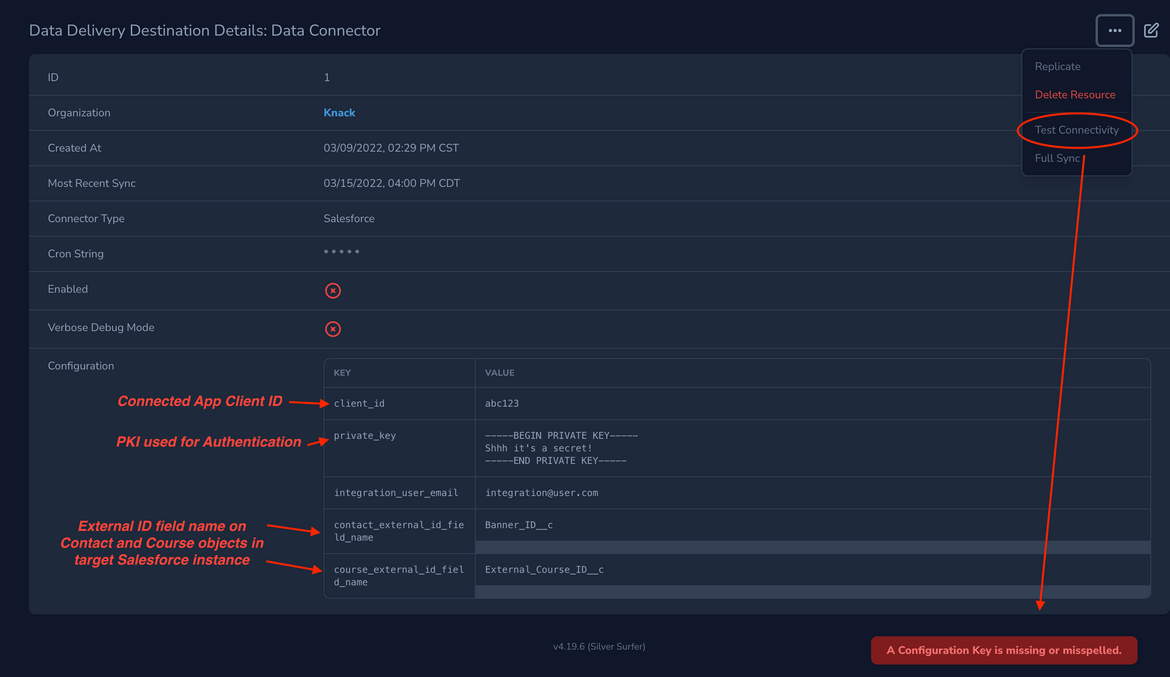
Operators can run a connectivity test and receive more verbose output than "Failure"
All we need to do is receive a bearer token and we know that we have a successful connection, so if we get a good response from RetrieveSalesforceBearerToken we know our ping was successful. As you can see in the code snippet below, we check for all config key/values, check the connector type, and meaningfully alert our Operations team if there are any errors:
class TestConnectivity
{
    use AsAction;

    /**
     * Execute the command.
     */
    public function handle(DataDeliveryDestination $dataDeliveryDestination): array|string
    {
        if ($dataDeliveryDestination->listMissingConfigKeys()) {
            return Action::danger('A Configuration Key is missing or misspelled.');
        }

        if (DataDeliveryDestinationType::SALESFORCE === $dataDeliveryDestination->connector_type) {
            $bearerTokenResponse = RetrieveSalesforceBearerToken::make()->handle($dataDeliveryDestination);

            if ($bearerTokenResponse->status() === 200) {
                return Action::message('Salesforce Connectivity Test Successful');
            }

            return Action::danger('A Configuration Value is incorrect');
        } elseif (DataDeliveryDestinationType::CSV === $dataDeliveryDestination->connector_type) {
            return Action::danger('Full sync not available for CSV Data Delivery');
        }

        return Action::danger('Unknown connector type');
    }
}
All actions described in this blogpost use the Laravel Actions library, which we highly recommend
Putting the Knack Salesforce app to use
Syncing Data
Now that we know that we have a successful connection we can run a full sync or partial sync of a partner’s Tutoring Session data. Once again we rely on our implementation of Laravel Nova, this time using the Full Sync action. We select a start date and the sync upserts all “Tutor Session” and “Student Tutor Session” records to Salesforce, as long as the object’s updated_at value is more recent than the specified time.
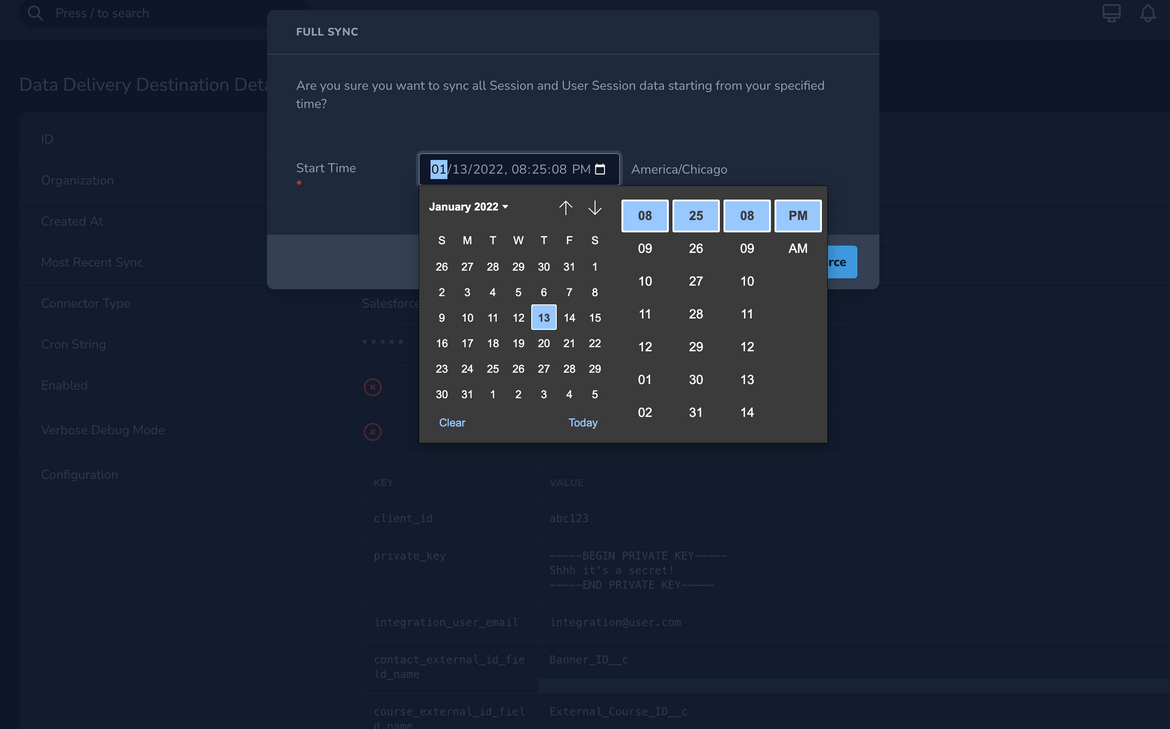
Full and partial sync options are available
After the sync is complete we can check our Salesforce instance for the data. New records should be added as Tutoring Session and Student Tutoring Session custom objects. Existing records that were updated in Knack since the most recent sync will also be updated so that all data in Salesforce matches what is in our database for an organization. We can use our custom tab to view our data in Salesforce, and depending on the cron string that is set in the partner’s Data Delivery Destination a Salesforce instance could be updated as often as every hour.
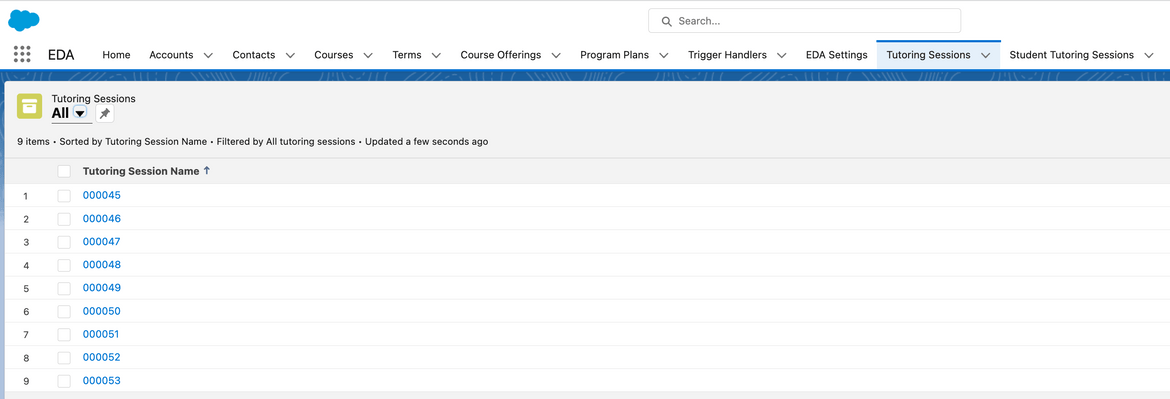
Tutoring Sessions have now been synced to Salesforce

Same image from above showing what a single Tutoring Session record looks like in Salesforce
We could shorten the sync interval to every minute if we would like, but that would have to be changed in Kernel.php:
$schedule->command(InitiateDataDeliveryCron::class)
            ->hourly() // changing this to ->everyMinute() would allow more frequent execution
            ->appendOutputTo($log)
            ->onOneServer();
Conclusion
That pretty much sums things up. We have an eloquent Salesforce package that allows us to store data that mirrors objects in our codebase, an integration written in Laravel, and steps for how our Operations team and partner schools can use the integration to greatly enhance academic resources for students. Now that our partners can view student tutoring data directly in their Salesforce instance, they can closely monitor students and encourage them to seek out tutoring services from their peers through Knack. 65% of students who use Knack had never used campus tutoring before, so bringing more information to administrators’ fingertips can only benefit the students of every institution that uses Knack Tutoring Technologies.